Taking screenshots on Mac is one of those essential skills every user needs, whether you’re documenting a bug for tech support, saving important information, or creating tutorials. While it might seem simple, mastering Mac’s screenshot capabilities can save you significant time and frustration.
In this comprehensive guide, you’ll discover four powerful methods to capture exactly what you need, plus expert tips for editing, organizing, and troubleshooting your screenshots.
Table of Contents
- Quick Reference: All Mac Screenshot Shortcuts
- Method 1: Capture Your Entire Screen
- Method 2: Select Any Area You Want
- Method 3: Capture a Specific Window
- Method 4: Use the Advanced Screenshot App
- Editing and Enhancing Your Screenshots
- File Management and Organization
- Troubleshooting Common Issues
- Pro Tips and Advanced Techniques
- Frequently Asked Questions
Quick Reference: All Mac Screenshot Shortcuts
| Shortcut | What It Does | Best For |
|---|---|---|
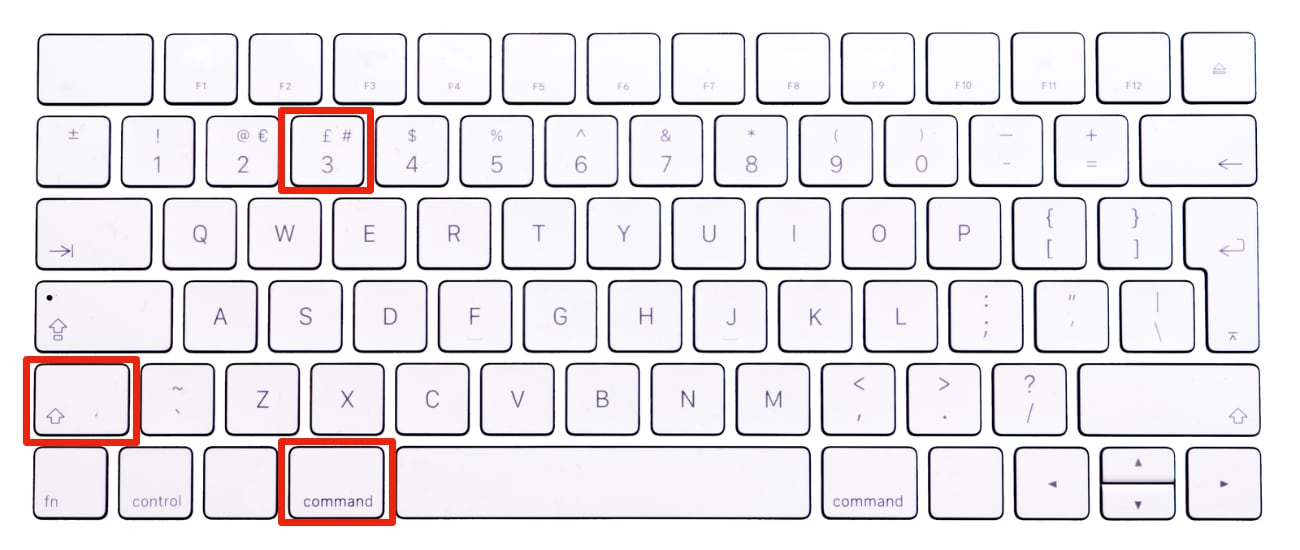
| ⌘⇧3 | Capture entire screen | Error messages, desktop setups |
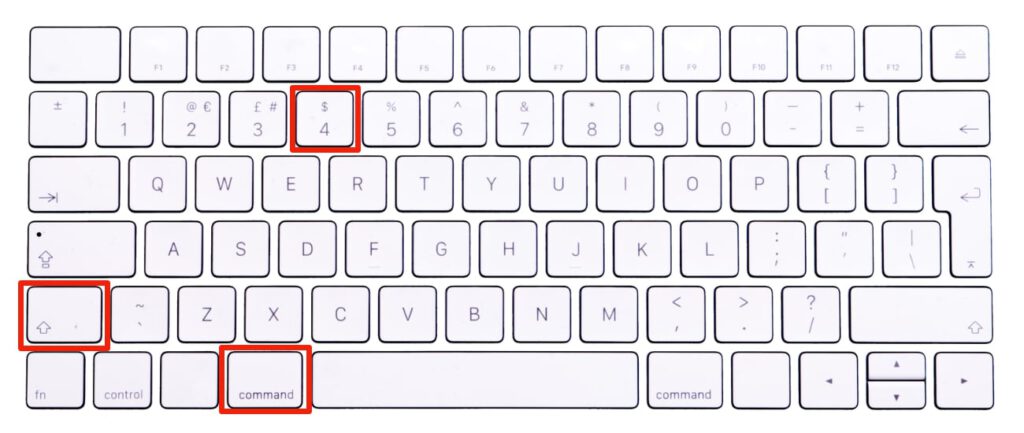
| ⌘⇧4 | Select custom area | Highlighting specific content |
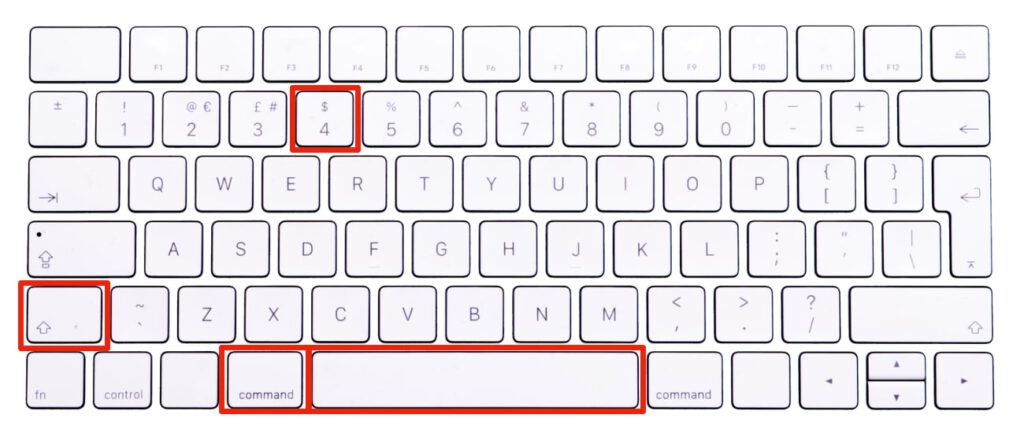
| ⌘⇧4 + Space | Capture specific window | App documentation, tutorials |
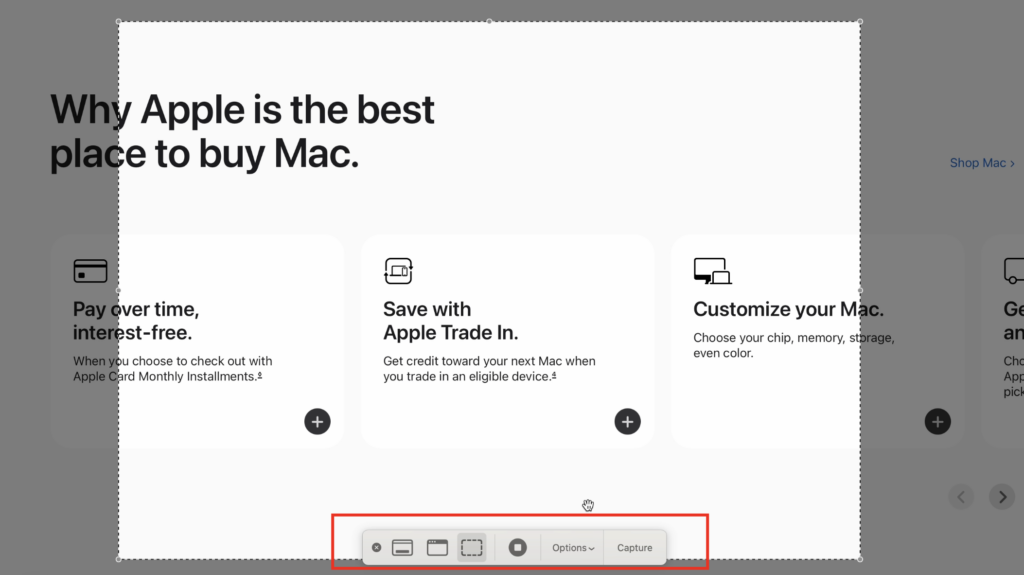
| ⌘⇧5 | Open Screenshot app | Screen recording, advanced options |
| ⌘⇧6 | Capture Touch Bar | MacBook Pro Touch Bar documentation |
Pro tip: Add Control (⌃) to any shortcut to copy directly to clipboard instead of saving a file.
Method 1: Capture Your Entire Screen (⌘⇧3)
This is the quickest way to capture everything visible on your screen – perfect for showing error messages, desktop configurations, or when you need to grab everything at once.
When to Use Full Screen Capture
- Documenting software bugs or error messages
- Sharing your desktop setup or wallpaper
- Capturing presentations in full-screen mode
- Creating before/after comparisons of your workspace
Step-by-Step Instructions
- Take the Screenshot:
- Press
⌘⇧3simultaneously - You’ll hear a camera shutter sound (if sound effects are enabled)
- The entire screen flashes white briefly
- Press

- Find Your Screenshot:
- Look for the file on your desktop
- It’s automatically named “Screen Shot [date] at [time].png”
- The file appears as a PNG for the highest quality
- Multiple Displays:
- If you have multiple monitors connected, this captures ALL screens
- Each display creates a separate file
- Files are numbered sequentially
Alternative: Copy to Clipboard Instead
- Press
⌘⌃⇧3to copy the screenshot directly to your clipboard - Perfect for pasting immediately into emails, documents, or chat apps
- No file is saved to your desktop
Method 2: Select Any Area You Want (⌘⇧4)
This method gives you precise control over exactly what gets captured, eliminating distractions and focusing on what matters most.
When to Use Area Selection
- Highlighting specific text or interface elements
- Cropping out sensitive information
- Creating clean, focused images for presentations
- Capturing portions of web pages or documents
Step-by-Step Instructions
- Activate Selection Mode:
- Press
⌘⇧4 - Your cursor changes to a crosshair with coordinates
- The screen dims slightly
- Press

- Make Your Selection:
- Click and drag to create a selection rectangle
- You’ll see the dimensions displayed in real-time
- Release the mouse button to capture
- Fine-Tune Your Selection:
- Reposition: Hold Space while dragging to move the entire selection
- Constrain proportions: Hold Shift to lock vertical or horizontal edges
- Cancel: Press Escape to exit without taking a screenshot
- Capture and Save:
- The selected area is saved as a PNG file on your desktop
- A thumbnail appears briefly in the corner for quick editing
Advanced Selection Tips
- Precise positioning: Use the coordinate display to align selections perfectly
- Copy to clipboard: Use
⌘⌃⇧4to skip file saving - Multiple selections: Repeat the process to capture several areas quickly
Method 3: Capture a Specific Window (⌘⇧4 + Space)
This technique captures a complete application window with its shadow and rounded corners, creating professional-looking screenshots perfect for documentation.
When to Use Window Capture
- Creating software tutorials or documentation
- Sharing specific app interfaces
- Capturing dialog boxes or pop-up windows
- Professional presentations requiring clean window shots
Step-by-Step Instructions
- Enter Window Selection Mode:
- Press
⌘⇧4first - Then tap the
Spacebar - Your cursor becomes a camera icon
- Press

- Select Your Target Window:
- Move the camera icon over any window
- The window highlights in blue when selected
- Works with any open application, menu, or dialog
- Capture the Window:
- Click once to take the screenshot
- The window is captured with its drop shadow and transparency effects
- A thumbnail appears for immediate editing
What Gets Captured
- The complete window including title bar and borders
- Natural drop shadows and rounded corners
- Transparent elements (like translucent sidebars)
- The window appears “floating” against a transparent background
Troubleshooting Window Capture
- Window won’t highlight: Make sure it’s not minimized or hidden behind others
- Protected content: Some apps (like DVD Player) block window captures for copyright reasons
- Menu capture: You can capture menus by keeping them open and using this method
Method 4: Use the Advanced Screenshot App (⌘⇧5)
Introduced in macOS Mojave, the Screenshot app provides the most control and flexibility, including screen recording capabilities.
When to Use the Screenshot App
- Recording screen videos with audio
- Setting screenshot timers for hard-to-capture moments
- Changing default save locations
- Accessing all screenshot options in one place
Step-by-Step Instructions
- Launch the Screenshot App:
- Press
⌘⇧5 - A toolbar appears at the bottom of your screen
- All options are visually displayed
- Press

- Choose Your Capture Type:
- Capture Entire Screen: First icon (same as ⌘⇧3)
- Capture Selected Window: Second icon (same as ⌘⇧4 + Space)
- Capture Selected Portion: Third icon (same as ⌘⇧4)
- Record Entire Screen: Fourth icon for video recording
- Record Selected Portion: Fifth icon for partial screen recording

- Configure Advanced Options:
- Click “Options” to access advanced settings
- Choose save location (Desktop, Documents, Clipboard, etc.)
- Set a timer delay (5 or 10 seconds)
- Enable/disable mouse cursor in captures
- Show mouse clicks in recordings
- Capture or Record:
- Click “Capture” for screenshots
- Click “Record” to start screen recording
- A stop button appears in the menu bar during recording
Screen Recording Features
- Audio recording: Capture system audio or microphone input
- Quality settings: Choose recording quality and frame rate
- Pointer options: Show or hide mouse cursor and clicks
- File formats: Recordings saved as MOV files
Editing and Enhancing Your Screenshots
Mac’s built-in editing tools are more powerful than many users realize, offering professional-grade annotation and markup capabilities.
Accessing the Built-in Editor
After taking any screenshot, a thumbnail appears briefly in the bottom-right corner. Click it to open the editor immediately, or find the file later and double-click to edit.
Essential Editing Tools
- Markup Tools:
- Sketch: Freehand drawing in various colors and thicknesses
- Text: Add formatted text boxes with customizable fonts
- Signature: Insert your saved signature
- Magnifier: Highlight areas with a magnifying glass effect
- Shape Tools:
- Rectangle/Circle: Perfect geometric shapes
- Arrow: Point to specific elements
- Line: Draw straight lines and connectors
- Enhancement Tools:
- Crop: Remove unwanted edges and resize
- Rotate: Adjust orientation
- Adjust Colors: Modify brightness, contrast, and saturation
Professional Editing Workflow
- Start with cropping to remove distractions
- Add arrows or shapes to highlight key elements
- Use text annotations to explain important points
- Apply consistent colors for professional appearance
- Export in appropriate format for your intended use
When to Use Third-Party Apps
Consider apps like Skitch, Lightshot, or Monosnap when you need:
- Advanced blur effects for sensitive information
- Bulk editing capabilities
- Cloud storage integration
- Team collaboration features
- Custom templates or watermarks
File Management and Organization
Keeping your screenshots organized saves time and prevents desktop clutter.
Changing Default Save Location
- Using Screenshot App:
- Press
⌘⇧5and click “Options” - Select your preferred save location
- Choose from Desktop, Documents, Clipboard, or custom folder
- Press
- Creating a Screenshots Folder:
- Make a dedicated Screenshots folder in Documents
- Set it as default in Screenshot app options
- Consider subfolders by project or date
File Naming and Organization
Default naming: “Screen Shot 2025-09-17 at 2.30.45 PM.png”
Better organization strategies:
- Rename files descriptively: “Login-error-message.png”
- Use date prefixes: “2025-09-17-bug-report.png”
- Create project folders: “Website-redesign/homepage-mockup.png”
Bulk Management Tips
- Quick Look: Select multiple screenshots and press Space for preview
- Batch rename: Select files, right-click, and choose “Rename”
- Tags: Add color tags for easy categorization
- Smart folders: Create auto-organizing folders based on file criteria
Troubleshooting Common Issues
Even experienced users encounter screenshot problems. Here are solutions to the most common issues.
Screenshots Not Saving
Check these solutions:
- Desktop permissions: Ensure you can save files to Desktop
- Storage space: Free up disk space if drive is full
- System settings: Verify shortcuts aren’t disabled in System Preferences > Keyboard > Shortcuts
- Restart: Simple restart often resolves temporary glitches
Keyboard Shortcuts Not Working
Troubleshooting steps:
- Check System Preferences > Keyboard > Shortcuts > Screenshots
- Look for conflicting shortcuts in other apps
- Reset shortcuts by unchecking and rechecking them
- Try alternative methods like Screenshot app (⌘⇧5)
Poor Image Quality
Common causes and fixes:
- Retina display scaling: Check Display preferences for optimal resolution
- Third-party app compression: Use built-in tools for highest quality
- File format issues: PNG provides better quality than JPEG
- Display settings: Ensure proper resolution and color calibration
Black or Blank Screenshots
Possible solutions:
- Protected content: Some apps block screenshots for security
- External display issues: Try disconnecting and reconnecting monitors
- Graphics problems: Update graphics drivers or restart computer
- Privacy settings: Check Security & Privacy settings for screenshot permissions
Unable to Capture Specific Content
When screenshots are blocked:
- DRM-protected content: Videos, streaming services often block capture
- Security software: Some apps prevent screenshots for privacy
- Workarounds: Use camera phone for documentation, or check app-specific export options
Pro Tips and Advanced Techniques
Touch Bar Screenshots (MacBook Pro)
MacBook Pro users can capture the Touch Bar:
- Press
⌘⇧6to screenshot the Touch Bar - Useful for documenting Touch Bar customizations
- Saved as a separate image file
Timed Screenshots
Perfect for capturing menus, tooltips, or hover effects:
- Open Screenshot app (
⌘⇧5) - Click “Options” and select timer (5 or 10 seconds)
- Choose your capture method
- Use the delay to set up the perfect shot
Custom Keyboard Shortcuts
Create personalized shortcuts in System Preferences:
- Go to System Preferences > Keyboard > Shortcuts
- Select Screenshots from the sidebar
- Double-click any shortcut to customize it
- Choose key combinations that work better for your workflow
Clipboard Management
Maximize clipboard screenshot efficiency:
- Use
⌘Vto paste clipboard screenshots anywhere - Clipboard screenshots don’t clutter your desktop
- Perfect for quick sharing in messages or emails
- Consider clipboard manager apps for multiple screenshot history
Screenshot Automation
For repetitive screenshot tasks:
- Automator workflows: Create custom screenshot automations
- AppleScript: Script complex screenshot sequences
- Third-party tools: Apps like Hazel can auto-organize screenshots
- Scheduled captures: Use cron jobs or scheduling apps for regular screenshots
Frequently Asked Questions
Can I change the screenshot file format from PNG?
By default, Mac saves screenshots as PNG files for the highest quality. To change the format:
- Open Terminal
- Type:
defaults write com.apple.screencapture type jpg(or gif, pdf, tiff) - Press Enter and restart your Mac
PNG is recommended for most uses due to its lossless compression and transparency support.
How do I remove the drop shadow from window screenshots?
To capture windows without shadows:
- Open Terminal
- Type:
defaults write com.apple.screencapture disable-shadow -bool true - Press Enter and log out/in for changes to take effect
Can I screenshot protected content like Netflix or Amazon Prime?
Most streaming services block screenshots due to copyright protection (DRM). This is intentional and cannot be bypassed through normal screenshot methods. Some workarounds include:
- Using external recording devices
- Taking photos with your phone
- Checking if the service offers official screenshot features
What’s the maximum resolution for Mac screenshots?
Screenshots capture at your display’s native resolution. For Retina displays, this means very high-resolution images. File sizes can be large, so consider:
- Compressing images for web use
- Using JPEG format for smaller file sizes
- Cropping to reduce dimensions when possible
How do I take screenshots on external monitors?
External monitor screenshots work automatically:
⌘⇧3captures all connected displays as separate files⌘⇧4works on any display where you make the selection- Window capture works regardless of which display contains the window
Can I schedule automatic screenshots?
While Mac doesn’t have built-in scheduled screenshots, you can:
- Use Automator to create timed workflows
- Install third-party apps like Timed Screenshot
- Create AppleScript applications with timer functionality
- Use terminal commands with cron jobs for advanced users
Conclusion
The key is choosing the right method for each situation: full screen for comprehensive captures, area selection for precision, window capture for clean app documentation, and the Screenshot app for advanced features and screen recording.
Remember to organize your screenshots systematically, take advantage of the built-in editing tools, and don’t hesitate to explore third-party options when your needs grow more complex. With practice, these keyboard shortcuts will become second nature, making you a more efficient and effective Mac user.
Start with the basic shortcuts, gradually incorporate the advanced features, and soon you’ll be capturing and sharing visual information like a pro. Your improved screenshot skills will benefit everything from work presentations to family photo organization, making this one of the most valuable Mac techniques you can learn.
