Locking your Mac screen should take one second, not ten. But Apple, in typical Apple fashion, doesn’t make this obvious. There are actually seven different ways to lock your Mac screen, and each one has its place. Let me show you all of them, from the quickest to the most secure.
Why You Need to Lock Your Screen (Even at Home)
Look, I used to think screen locking was paranoid. I work from home now. Who’s going to see my screen? My cat?
Then reality hit:
- Video calls where screen sharing goes wrong
- Kids who think daddy’s laptop is a toy
- Delivery people who arrive while you’re getting signatures
- That split second when someone walks behind you at a coffee shop
- House guests who “just need to check something quick”
And at the office? Not locking your screen is basically asking for someone to send “I love spreadsheets” from your Slack account. Best case scenario.
Method 1: The Instant Keyboard Shortcut
This is the fastest method. Period. Burn this into your muscle memory:
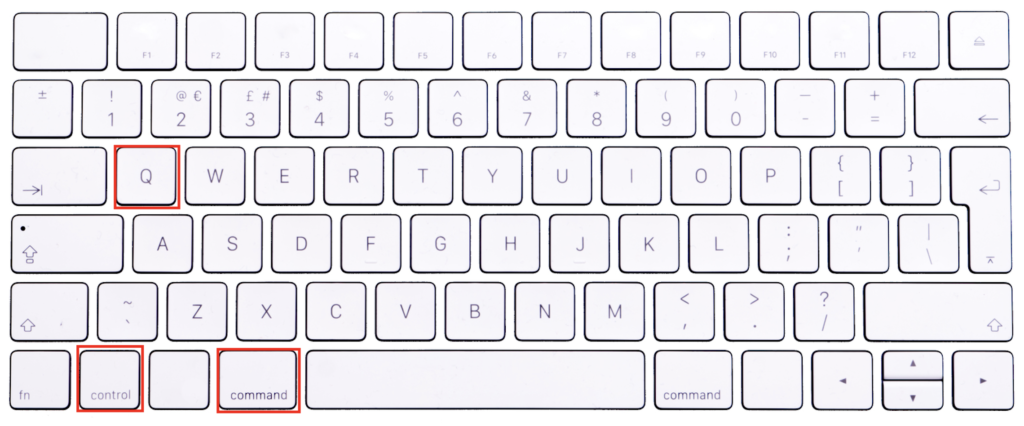
Command + Control + Q

That’s it. Press these three keys, screen locks immediately. No confirmation, no delay, just locked.
How to remember it:
- Command + Control = I need control
- Q = Quick/Quit viewing
When it doesn’t work: Some older Macs (pre-2016) might not respond to this. If nothing happens, your Mac might need the next method instead.
Pro tip: Practice this combo ten times right now. Seriously. Command + Control + Q. Make it automatic. Your future self will thank you when the boss walks over unexpectedly.
Method 2: The Power Button Method
On newer MacBooks with Touch ID:
Just press the Touch ID button (power button)
One press. Not hold. Just a quick press. Screen locks instantly.
Why this is genius:
- Touch ID button is always there
- Works even when keyboard shortcuts fail
- Same button unlocks it later
- No accidental shutdowns (that requires holding)
The muscle memory trick: Every time you stand up, tap Touch ID. Make it automatic. Stand = lock. It becomes second nature after a week.
For older Macs without Touch ID: This won’t work. Skip to Method 3.
Method 3: The Hot Corner Setup
This is my personal favorite for desktop iMacs. You flick your mouse to a corner, screen locks. Feels like magic.
How to set it up:
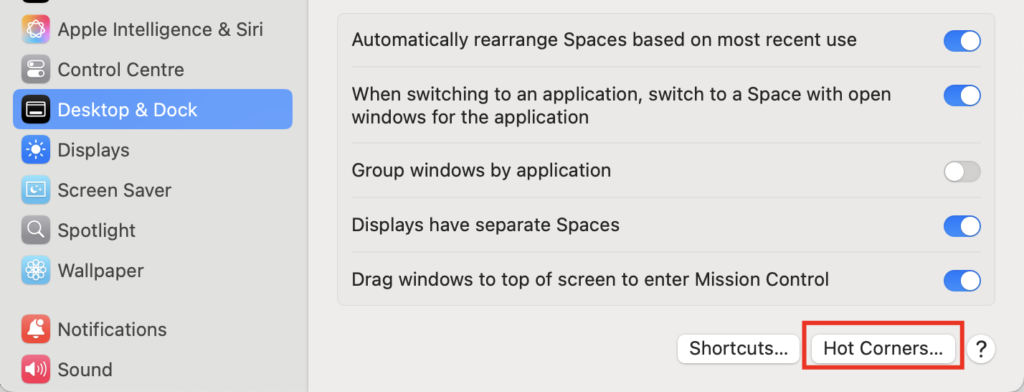
- System Settings (or System Preferences on older macOS)
- Desktop & Dock
- Scroll down to “Hot Corners” button (bottom right)
- Pick a corner (I use bottom-left)
- Select “Lock Screen” from dropdown
- Click OK

My setup logic:
- Bottom-left: Lock Screen (easy to hit when leaving)
- Top-right: Mission Control (see all windows)
- Other corners: Disabled (prevents accidents)
The accidental trigger problem: Yeah, you’ll hit it by accident at first. After a week, your mouse naturally avoids that corner unless you mean it. Trust the process.
Hot corner modifier trick: Hold Command while setting hot corner = corner only works when Command is held. Prevents accidents completely.
Method 4: The Menu Bar Method
For people who prefer clicking to keyboard shortcuts:
Click Apple logo → Lock Screen
That’s it. Two clicks.
When this is useful:
- Keyboard is acting up
- You’re already using the mouse
- Teaching someone else how to lock
- One hand is holding coffee
The faster menu bar way: If you lock/unlock frequently, add Lock Screen to Control Center:
- System Settings → Control Center
- Find “Lock Screen”
- Set to “Show in Menu Bar”
- Now it’s one click from menu bar
Method 5: The Terminal Command Method
For the command line lovers and automation freaks:
Open Terminal and type:
pmset displaysleepnow
Or for true lock (requires password immediately):
/System/Library/CoreServices/Menu\ Extras/User.menu/Contents/Resources/CGSession -suspend
Why bother with Terminal?
- Can be scripted
- Can be triggered remotely
- Can be part of automated workflows
- Makes you look like a hacker (kidding, sort of)
My automation setup: I have an Alfred workflow that locks screen, mutes volume, and pauses music with one command. Overkill? Maybe. Satisfying? Absolutely.
Method 6: The Apple Watch Method
If you have an Apple Watch, this is pretty cool:
When you walk away, Mac locks automatically
Setup:
- System Settings → Security & Privacy
- Advanced button
- Check “Use your Apple Watch to unlock apps and your Mac”
The catch: It automatically locks when you walk away, but distance varies. Sometimes 10 feet, sometimes 30. Don’t rely on this for security. It’s convenience, not protection.
When it’s actually useful:
- Home office where you frequently step away
- Meetings where you’re constantly in and out
- Paired with manual locking for double security
Method 7: The Screen Saver Lock
Old school but reliable:
Set screen saver to require password:
- System Settings → Lock Screen
- Set “Require password after screen saver begins” to “Immediately”
- Set screen saver to start after 1 minute
Then trigger screen saver with:
- Hot corner (different from lock screen)
- Keyboard shortcut (if you set one)
- Wait 1 minute
Why use this instead of direct lock?
- Pretty screen savers (I miss those aquarium ones)
- Less jarring for presentations
- Can show clock/info while locked
- Nostalgia
Setting Up Proper Lock Screen Security
Locking is useless if it doesn’t require a password. Here’s the proper setup:
Essential Settings:
- System Settings → Lock Screen
- “Require password after screen saver or display sleep” → Immediately
- Turn OFF “Use Apple Watch to unlock” if maximum security needed
- Set “Show message when locked” (optional but useful)
My locked message: “If found, please email: [email]” Simple, effective, not paranoid-looking.
Password vs Touch ID vs Apple Watch:
- Password: Most secure, most annoying
- Touch ID: Perfect balance
- Apple Watch: Convenient but least secure
Pick based on your threat model. Coffee shop = Touch ID. NSA target = password only.
Common Problems and Fixes
“Shortcut doesn’t work”
Check these:
- System Settings → Keyboard → Shortcuts
- Look for conflicts
- Some apps override system shortcuts
- Try safe mode to test
“Screen wakes up immediately after locking”
Usually caused by:
- Bluetooth mouse moving slightly
- Notifications waking screen
- External monitor issues
Fix: System Settings → Lock Screen → uncheck “Show notifications on lock screen”
“Hot corners stopped working”
Happens after updates sometimes:
- Reset hot corners (set to disabled, then back)
- Restart Mac
- Check accessibility permissions
“Mac won’t unlock with Touch ID”
Three attempts then it requires password. This is security, not a bug. Also check:
- Wet fingers don’t work
- Re-register fingerprint if persistent
- Some apps always require password
Different Scenarios, Different Methods
At home office: Hot corner + Apple Watch auto-lock. Convenient, good enough.
Coffee shop: Command + Control + Q when stepping away. Every. Single. Time.
Office with nosy coworkers: Touch ID button tap. Quick, subtle, reliable.
Presentation mode: Disable all auto-lock. Nothing worse than screen locking mid-presentation.
Paranoid mode: Command + Control + Q + flip laptop closed + take laptop with you.
My Daily Lock Screen Routine
Morning: Unlock with Touch ID, check hot corner is enabled
During work:
- Bathroom break: Touch ID tap
- Lunch: Command + Control + Q
- Quick question from someone: Hot corner
- End of day: Lock + close lid
The habit that changed everything: Lock screen BEFORE standing up, not after. This one shift prevented 100% of “oh crap” moments.
Speed Test: Which Method is Actually Fastest?
I tested each method 10 times. Average results:
- Touch ID button: 0.3 seconds
- Command + Control + Q: 0.5 seconds
- Hot corner: 0.7 seconds
- Apple menu: 2.1 seconds
- Terminal: 5+ seconds (including opening Terminal)
Winner: Touch ID button, but only if your hand is already near it. Keyboard shortcut wins for typing position.
Advanced Tips Nobody Mentions
The meeting room setup: Create a Shortcuts app automation:
- Lock screen
- Mute volume
- Turn on Do Not Disturb
- Set Slack to away One button, meeting ready.
The dual monitor trick: Hot corner on external monitor works even when MacBook is closed. Put lock corner on external screen for clamshell mode.
The kids/cat protection: Set hot corner with modifier key (Command + corner). Prevents accidental locks from curious fingers or paws.
The quick peek method: Instead of unlocking fully, just press Touch ID briefly to peek at notifications. Release to re-lock. Saves time for quick checks.
What About Windows Switchers?
Coming from Windows where Windows + L is muscle memory?
Make Mac similar:
- System Settings → Keyboard → Shortcuts
- Add custom shortcut
- Make it Command + L
- Your muscle memory thanks you
But honestly? Command + Control + Q is better once you adapt. It’s actually reachable with one hand.
The Security Reality Check
Let’s be honest about what screen locking actually protects:
It DOES prevent:
- Casual snooping
- Accidental clicks
- Embarrassing moments
- Most opportunistic access
It DOESN’T prevent:
- Determined attackers with physical access
- Cold boot attacks
- Hardware keyloggers
- Your IT department (they have ways)
Screen locking is about privacy and basic security, not Fort Knox protection. For real security, you need FileVault, strong passwords, and physical control.
The Bottom Line
You need exactly two methods memorized:
- Primary: Command + Control + Q (or Touch ID tap)
- Backup: Hot corner
Practice your primary method until it’s automatic. Set up the backup for when primary fails. Ignore the rest unless you’re automating.
The best security is the one you actually use. A simple screen lock you do every time beats complex security you skip because it’s annoying.
Start today. Right now. Press Command + Control + Q. See how fast that was? Do it every time you step away. Your data, your privacy, and your dignity (no more prank Slack messages) will thank you.
Quick Reference Card
Fastest Lock Methods:
- Touch ID button (0.3 sec)
- Command + Control + Q (0.5 sec)
- Hot corner (0.7 sec)
Essential Settings Location: System Settings → Lock Screen → Require password → Immediately
Hot Corner Setup: System Settings → Desktop & Dock → Hot Corners
For Automation: Terminal: pmset displaysleepnow
Windows Muscle Memory: Remap to Command + L if needed
Now stop reading and go practice. Command + Control + Q. Ten times. Make it automatic. Your future self will thank you next time someone walks up to your desk unexpectedly.
